| Return to questions listing: | ||||||
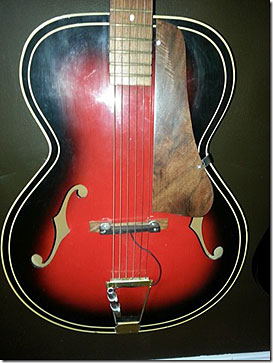
Reglueing the neck joint To Whom This May Concern: I recently inherited an early 60's archtop guitar (probably a Kay by the shape of the headstock). The guitar had no distinguishing markings or logos to tell me exactly what it was. Here is what the guitar looked like when I got it. The person I got it from said it was from the 30's or 40's. The shape of the headstock and truss rod cover led me to believe it was a Kay.
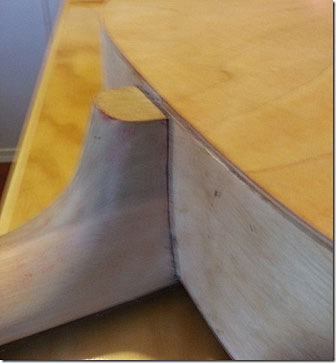
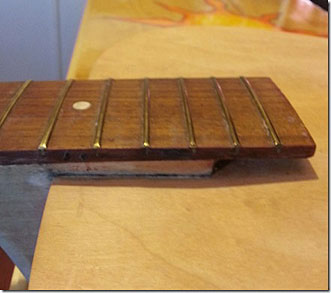
The reason I'm contacting you is to find out about the neck and body joint. I was going to remove the neck but after researching information how it's done I've decided against it. I just wanted the joint around this area to be sanded properly. I heated up a couple of palette knives using a clothes iron and slid it between the joints top and bottom to remove the glue. Now that I'm not removing the neck. I'm worried that the string tension may pull the neck loose. I understand that there is a dovetail joint which, to remove, involves steaming the joint inside through a drill hole. I didn't touch that area and it's still intact. Here are two pictures of the joints where the neck meets the body and where I applied the heated palette knife. Is there a way to insure this joint remains solid or how I can put glue back into these areas?
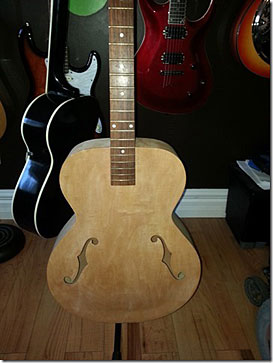
I really want to keep this guitar with a natural finish instead of paint. It has a beautiful grain to the top and back which I will bring out using a rub on stain and then clear coat it. The guitar has a nice rich tone and hopefully I can maintain that. If you can help me please let me know? Thanks, Glenn, First, get in a time machine, go back and don't mess with that classic finish! In the photo the original finish looks perfect. The opaque finish is because the wood is not beautiful. Plywood is made by unrolling a log like a roll of toilet paper, then stacking and gluing at least three plies, with the center ply cross grain to the top and bottom plies. Wood for guitar making is quarter sawn, "pie sliced" out of a log so that the annual rings stand perpendicular the stress. Quartered wood is stronger so it can be cut thinner. The wood on your guitar was unrolled off a log, and Someone loved that guitar enough to make it a burl walnut pickguard when the original plastic one disintegrated. Your guitar neck is held on with a dovetail joint. Setting cutters to fit a dovetail perfectly was difficult and the fit changed as the cutter dulled. So the true options were to cut the dovetail too tight, and then hand shave it until it fit perfectly (Martin, Gibson, Guild etc.) or too loose, and then float the joint together with hide glue (Kay, Harmony). The hide glue would last for a few years to a few decades and then the joint would fail and somewhat short of an eighth inch gap would appear at the bottom of the heel, between the neck and the body. There seems to be no such gap on yours, so my guess is that whoever made the pickguard also reglued the neck. But judging by the fact that your bridge is crazy low, he didn't refit it, increasing the dropback angle to compensate for the natural wood compression from string tension that changes the neck angle with age. The neck needs to come off and be refit so that the gaps you made close, and a normal height bridge can be installed. A slick trick is to run a straight edge from the first fret to the bridge top and then shave the heel until there is a 5/64" gap between the straight edge and the top of the 12th fret. Finish the neck and the body separately to facilitate buffing. A short cut to solving your neck set problem is to take a thin bladed Japanese pull saw, lay the guitar on its face and make a vertical cut from the heel cap to the fingerboard (stop at the trussrod), about 1/8" from the body of the guitar. Sand the kerf until, upon pinching it closed, the neck angle is right. Buy a metal heel pin and buy a screw long enough to go through the button, through the heel, through the side and about an inch into the neck block (2" to 3', but measure it yourself). Drill out the button so that the long screw will fit through it. Hold the fitted gap closed and drill a pilot hole, from a good place on the heel for a heel Steve Mason
|